How Do I Fix A Coolant Leaking Water Pump?
Read Time:10 Minute, 49 Second
How do you fix a leaking coolant water pump? Since it drives the entire cooling system, the water pump serves as its brain. Water is forced through every engine passage, into the radiator, and back again by the pump’s impeller blades in a continuous loop. Some pumps malfunction internally and exhibit early signs of trouble by leaking or overheating in general. Water pumps hardly ever experience unexpected failure. They gradually deteriorate and manifest externally. Such early warning indicators can be identified by a watchful vehicle owner, who can then make repairs before the problem gets worse.
What Is A Coolant?
You might want to familiarize yourself with the definition of a coolant before diving into the subject so that you can understand the issue better. Commonly referred to as a coolant, glycol and water is a mixture. Either ethylene or propylene glycol could be the substance. Depending on the type you wish to purchase, the coolant may come in a variety of colors. It might be pink as well as green, blue, or purple.
The coolant’s function, however, is what. The name makes it clear what it does. The coolant’s job is to keep the engine from overheating. In other words, to protect the engine from any potential freezing or boiling. Since the coolant is typically liquid, it can readily absorb heat and prevent the engine from boiling.
The problem arises, though, if the coolant is unable for any reason to perform its function properly. Even though you won’t experience symptoms right away, you will still be in danger. Additionally, it is riskier because you won’t know what is wrong with your car and might mistake the symptoms for radiator failure. As a result, you must use the proper coolant and monitor its performance.
Five Common Reasons For Coolant Leak
To begin with, how do you know that the leak you have discovered is a coolant leak? If you notice any fluid on the floor while the car is parked, that is the first and most obvious sign of a leak. By observing any appreciable change in the temperature gauge, you can also detect a coolant leak.
You need to confirm that a coolant leak is the cause of these symptoms if you experience them. Fill the expansion tank to capacity, and then check the coolant level. A coolant leak will be apparent if fluid starts to drip. Let’s move on to the potential causes of your leak.
Leaked Radiator Cap
The radiator cap has a challenging job to complete. You might believe that this small piece of material doesn’t have a significant role to play. However, if you do, you are mistaken. The cap makes sure that the radiator stays sealed because it is constantly under intense pressure.
It follows that the coolant won’t drain. With time, the spring and cap may both start to degrade. To ensure everything is running smoothly, you must keep an eye on the radiator cap.
Blown Head Gasket
The head gasket’s primary function is to maintain the separation of the coolant and engine oil. You are in big trouble, though, if the head gasket blows or otherwise fails to do its job. As the head gasket experiences both high and low pressure from the engine, it may blow over time. For quite some time, you won’t even be aware if that occurs.
But you must act right away to fix the problem as soon as you are certain that the head gasket has blown. Since the head gasket is insufficient, there won’t be a way to separate the coolant from the engine oil. The engine cooling function will therefore not operate. Where all of that leads, you are well aware.
The Radiator Has A Hole
One of the main causes of a coolant leak is having a damaged or hole in the radiator. A very effective component of the engine in your car is the radiator. For it to accomplish its goal, it must pay a heavy price. As a result of doing its job, the tubes may eventually lose the ability to carry out their tasks.
As a result, it’s possible that the tubes will become clogged with sediment or debris. And eventually a leak will result from it. These leaks can occasionally also be caused by the hoses that are attached to a radiator. These hoses may harden over time and become less effective at sealing. As a result, any location close to the connection where the hoses attach to the radiator is vulnerable to leaks.
Problematic Expansion Tank
A malfunctioning expansion tank may also cause the coolant to leak! The expansion tank makes sure that the radiator receives coolant. It is a plastic container that is located directly next to the engine. We are all aware of the fragility of plastic. The expansion tank could deform as a result of temperature variations or other factors.
If that takes place, it will be unable to carry out its tasks. The result will be a coolant leak.
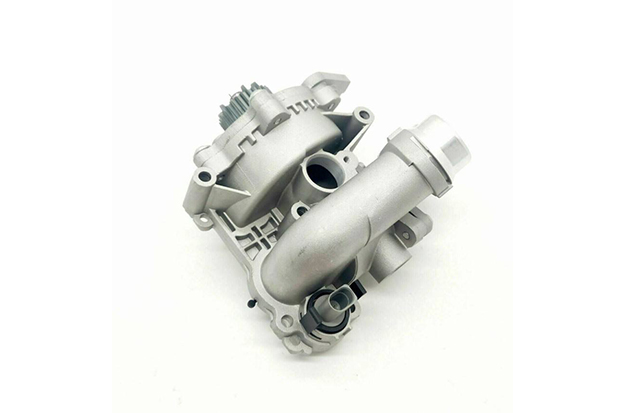
Failed Water Pump
On the lower portion of the engine, the water pump is essentially located next to the drive belts. Commonly, it joins the lower hose of the radiator. A water pump‘s responsibility is to move the coolant around the entire cooling system. Therefore, it has a significant impact on cooling.
It will stop working effectively if the connection gets loose or the hose ages and wears out. As a result, the engine will suffer from a leak and other issues.
How Can A Coolant Leaking Water Pump Be Fixed?
Step 1: Put the car in park and engage the emergency braking system. Make sure the engine is off. Locate the front of the water pump by opening the hood. At the pump housing flange’s edges where it attaches to the engine block, look for any indications of leakage. Verify that each water pump mounting bolt is visible and appears to be in place; check to make sure none have worn out or vanished. You can tighten the bolts again in accordance with the manufacturer’s instructions if a tiny leak develops here. It is capable of plugging a tiny leak. Additionally, use the proper screwdriver or small socket to tighten the clamps on the heater hose and lower radiator hose.
Step 2: Run the engine until it reaches operating temperature, then turn it off. Lift the car with the floor jack, then set two jack stands beneath the frame close to the front wheels. View the water pump’s underside by sliding under the front portion. The majority of water pumps have a “weep” hole, also known as a bypass hole, that allows water to pass through it in the event that the pump’s bearings and seals have failed. A failed pump shaft or seal is indicated by dripping water or rusty appearance at this location. The water pump shaft can also be moved back and forth to check for excessive play. A bad shaft bearing is indicated by this. The water pump needs to be replaced if any of these circumstances apply.
Step 3: Open the petcock valve on the radiator’s base to let the coolant flow into a pan. To better access the front of the pump, remove the fan shroud (if one is present). Pulley belts, including the belt for the water pump pulley, should be loosened and removed from front of the pulley. For the proper removal technique for your specific make, model, and year of vehicle, consult your owner’s manual.
Step 4: Using a screwdriver or pliers, disconnect the heater hoses and lower radiator hose at the water pump side. Using the appropriate sockets, remove the pulley on the water pump shaft and the pulley fan blade (if present).
Step 5: Utilizing the proper socket, remove all of the water pump housing bolts. From the block’s surface, remove the pump. To clean the engine block’s gasket mating surface, use a gasket scraper. Make sure there is no trace of the old gasket material. Install the new water pump gasket on the block mating surface after applying gasket adhesive to it. Use your fingers to run the mounting bolts into the mounting holes after aligning the new water pump. According to the torque requirements, tighten the mounting bolts (consult your owner’s manual for details).
Step 6: Install the parts in the same order that you removed them, or in whichever order is more practical. The hoses and fan pulley might be your first two points of contact. Reinstall the belts onto the corresponding pulleys and modify the belt tension as directed in your manual. Close the radiator petcock valve and reattach the fan shroud to its mounting brackets. Start the engine, add coolant, and then check for leaks at the pump housing or hose connections.
How Can Coolant Leak Be Avoided?
The engine is both negatively impacted by the coolant leak and suffers as a result. Your job will be halfway done if you can identify the causes of the coolant leak issue. Problem-solving is the remaining task. To identify any symptoms that might indicate a coolant leak, you must pay close attention. Then, you must handle the circumstance.
You can fix the issue by replacing any faulty radiators or leaky radiator caps. You must also replace the blown head gasket with the appropriate one in this scenario. Additionally, you must exercise extra caution when replacing a water pump. It won’t work to simply swap out the water pump for a suitable replacement. As installing the water pump is a very challenging process, you must ensure that you have done so correctly.
The precautions are always available for you to take, though. Get a better understanding of what’s going on by performing routine maintenance on your car. A good way to keep the car running better is to replace the coolant before the expiration date.
I Replaced My Water Pump, So Why Is Coolant Leaking Now?
When a water pump gets replaced, it’s not unusual to have some coolant leaking and for the weep hole to see some seepage. Small leaks might simply be the result of the seal’s break-in period. It could also just be air conditioning condensation, which is more noticeable after having just had some work done on your car.
If the liquid is heavy enough to be concerning though, you should definitely call the mechanic that serviced your car and see if you should take it back for more repairs. If they didn’t do a good job—which happens, regrettably—they ought to be responsible for fixing it by replacing any parts that weren’t installed properly.
If you replaced your own water pump, make sure everything is connected properly and check the hoses, and be sure you:
- Flushed the coolant system (a lot of people skip this step, and you really shouldn’t)
- Used new coolant, rather than using old, dirty coolant
- Didn’t add sealant to O-rings or gaskets, unless instructed to do so by the manufacturer
- Fully bled air from the cooling system
How Can A Water Pump Replacement Prevent Coolant Leaks?
It is preferable to leave this task to professionals if you are a beginner because it is very difficult to complete. However, if you decide to proceed anyway, the following advice will help. You’ll get it right this time if you heed these suggestions in addition to the fundamental rule.
- Don’t apply any sealant to seal
- Don’t use an old or too cold coolant
- Don’t forget to vent the cooling system properly
- “Do” use new coolant on a regular basis
Conclusion
Due to corrosion and contamination brought on by improper cooling system servicing or maintenance, water pumps may stop working.
When the water pump or other system components are changed, there may be excessive contamination left behind, which could cause a failure or a recurrence of a failure.
It’s important to clean the coolant reservoir and flush the cooling system when replacing a water pump or other system parts.
It’s a good idea to power flush your equipment or thermal cycle your cooling system three times with clean water.
The use of a coolant exchanger is the most efficient method. In accordance with the recommendations of the manufacturer, coolant should also be changed on a regular basis.
We advise using a refractometer to check the coolant’s concentration on a regular basis.
After extended periods of use, coolant can degrade, turn corrosive, or lose its ability to prevent rust.
For figuring out the level of acidity in coolants, test strips may also be available.
Mix concentrated coolant with the approved mixture, which is typically 50% coolant and 50% deionized water. This is one of the additional coolant-related tips.
Use pure drinking water because impurities can harm the system by reacting with the coolant. Deionized water is once more advised.
Keep eliminating to keep the system full. Heater core performance is negatively impacted by all trapped air and may even result in premature failure.


Average Rating