Why My Keurig Not Pumping Water – 7 Ways to Solve It
Read Time:14 Minute, 47 Second
Nobody enjoys getting ready to brew coffee only to discover that their Keurig is not dispense water. It is even more disappointing when you prefer brewing your own coffee to purchasing it from a coffee shop.
Let’s talk about some possible causes of your Keurig not pumping water, as well as some other potential Keurig water flow issues and solutions.
Why is Keurig Not Pumping Water? All You Need to Know
Presence of Air in the Line
Thinking about this point can be extremely difficult at times. Users may experience significant problems as a result of this very likely cause. There isn’t much to do. See what happens by performing the steps listed below.
- Take out the reservoir from the machine and fill it up to about a quarter full or so then put it back
- Once users notice a few tiny air bubbles rising from the water intake location at the bottom, quickly and consistently raise the reservoir up and down.
- Keep doing so until there are no more bubbles rising
- Once that is done, fill up the reservoir to the fill level then power your machine
- If the steps above are followed later, everything should restart and function normally.
- In this simple trick, the technique aids in driving out air from the line, restoring machine functionality to normal. This trick worked like magic for those who tried it out!
Clogged Water Line and Filter
This appears to be the main cause of your Keurig’s failure to pump water or its ability to pump water only partially. The most common reason for this malfunction has been the type of water that people use in their machines. Keep in mind that well water and tap water both contain significant amounts of calcium-containing minerals.
The system is hampered by the minerals that accumulate in the Keurig machine’s teeny water lines. If this is the situation with your coffee maker, you might want to try the following tips to descale and clean it. Vinegar has been shown to work like magic.
- First, add enough undiluted white vinegar or half vinegar and half water to completely fill the machine’s reservoir. Any case should function without a problem.
- Next, set a coffee cup on the drip tray. just Make sure the lid is air-tight closed and then run a brew cycle
- After dumping the coffee cup’s contents back into the water reservoir, run a second brew cycle. In the second round, shut off the machine as soon as the liquid is dispensed.
- Move on to the next step after giving the brewer about 30 minutes to rest, fill it with distilled water, and then run another brew cycle.
- remember to Repeat the above steps until the reservoir is drained completely
- Your issue should be resolved in the shortest amount of time if the aforementioned steps are followed correctly. Your coffee may occasionally have an odd taste, as you’ll discover. In such circumstances, you must perform numerous brew cycles using clean, or better yet, distilled water until things return to normal.
If the situation described above wasn’t your situation, you might want to look into the following error. Just keep in mind that while these solutions might work for others, they might not in your situation. To find something that works for you, you should therefore thoroughly examine each.
The More Water Please Misconception
Here, two likely events could have taken place. Either you’re using the wrong kind of water, or your reservoir is malfunctioning and communicating the wrong signals to the machine. Do not worry; the solution to fixing this mistake is provided below.
- First, fill the water reservoir to its highest level. Once it is securely reinstalled, press the next button. if that Didn’t work, Let’s keep going
- Empty the water reservoir’s contents after removing the container.
- Use a non-abrasive piece of cloth and wash it by hand, rinsing it completely afterward.
- be sure to check that the valve is not clogged at all
- If that occurs, fill the reservoir and put the device back together. Make sure the placement is proper. Try this last approach if the previous one did not solve the problem.
- Now, a float typically moves on top of it in the reservoir. The likelihood of your machine not receiving the right signals is high if the bottom is messed up.
- Do a little shaking or tapping now, and your Keurig should resume functioning properly.
If your water pumping issue is still an issue. There’s still hope for you, so don’t worry. These actions can be taken by you.
Damaged pump:
It’s time to thoroughly investigate whether the main obstruction is being caused by your water pump. Obviously, after operating for a while, some of these components start to wear out. If you discover that the pump is completely broken, you will need to replace it. The only thing that matters in this situation is that you make sure to buy the exact model that matches the features of your current Keurig machine.
- Avoid buying something at this point just to have a replacement. You do not want to involve yourself in this situation. Additionally, it is imperative that you seek technical or professional assistance, especially if you are unfamiliar with such matters.
- If you have the time, it may occasionally be necessary to perform a thorough check. It can be very efficient and spare you the trouble of trying every fix option. It’s possible that the approach we’re about to take is exactly what you need.
So, if you have the fortitude to handle it yourself, let’s get to work, shall we?
Instruments for Fixing the problem
This is for you to perform this strongly; you will need the following instruments;
- A screwdriver
- A small parking knife with a sharp end
- A toothpick or something equivalent and
- A plastic thumbtack
You should proceed down this road with a great deal of caution. So, here are a few steps to take that ought to resolve your Keurig issue.
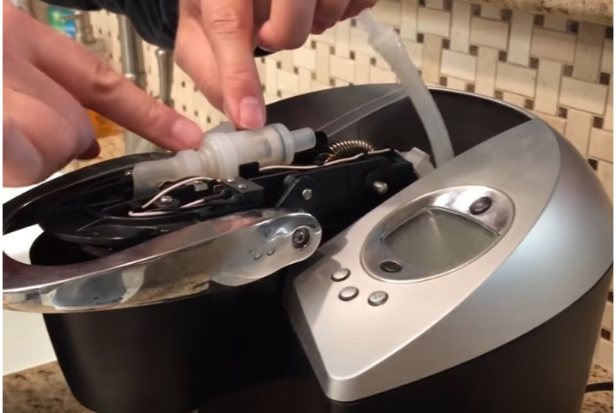
1. Starting off by Eliminating the Cover under the Handle
You should be aware of what you are because it is the most difficult part of the entire process. We would prefer not to harm ourselves or the machine further. You will have the option to clearly see the components causing problems with your machine with the top spread removed.
2. Working on the Interior
It’s time to identify the exact nature of the issue now that the interior components are clearly visible. You will discover a blade that feeds water into the pack. Below this blade, you can also see a rubber hose and an additional blade. Use your toothpick to carefully and slowly pierce each of the three holes in the upper blade.
Following that, make a mark on some nearby dried coffee grounds. Likewise, get rid of them. Additionally, keep in mind to pay close attention to everything you do. Verify that all of the hose’s ends are clean and free of obstructions. When you are finished and satisfied with your work, you can replace the removed components.
3. Testing the Coffee Maker
When you are finished restoring the upper case, refill the water reservoir to the top and then start the brewing process. Most likely, everything went back to normal, and your water siphoning machine is working just fine. The aforementioned techniques may seem highly technical and extreme, but if you maintain control, you’ll be able to complete your task exactly as you intended.
8 Fixes for a Keurig That is Not Dispensing Water
We’ll go over eight ways to fix a Keurig that won’t dispense water in this section. Upon finishing each fix, we advise you to run your coffee maker through a water-only brew cycle.
By doing so, you can determine if the issue has been resolved. If your Keurig can’t pump water, move on to the next step.
How to Fix Keurig 2.0 Blank Screen
Dispatch screen issues with the Keurig 2.0 are well known. Even when the screen is blank, some Keurig 2.0 machines keep brewing. To fix Keurig 2.0 blank screen:
- Check that Keurig 2.0 is plugged in and the power source is on and
- Check if the power button displays on the bottom right of the screen
- In order to test the screen, press the menu button. If this does not work proceed to the next hack
- To clean a blank Keurig 2.0 screen, use a glass cleaner, such as Windex. Keurig 2.0 screens that are empty and clean respond beautifully to Windex. Clean the Keurig’s screen by spritzing Windex or another glass cleaner onto a microfiber cloth. Do not squirt Windex directly onto the screen.
Disable Keurig Auto-Off Feature
Some Keurig brewers have an auto-off feature that turns the brewer off after it has been idle for a predetermined period of time without brewing. In general, Keurig coffee makers without displays that have auto-off features also have an auto-off light that turns on when the function is activated and off when it is off.
These Keurig brewers come in three different models: K-Select, K-Latte, and K-Cafe.
When using a Keurig without a display screen, turn the brewer off while leaving the plug in to disable the auto-off feature. Press the “Strong” and the “10 ounces” buttons simultaneously for 3-5 seconds and then turn the brewer on. You will notice that the “Auto-off” light is off.
Find the auto-off setting on Keurigs with display screens, like the K-Elite, in the menu items, and turn it off.
Ensure There is Enough Water in the Reservoir
The maximum level of fill is indicated on the water tank by markings. Ensure that the water is well above the halfway line but below the max level to remove the “Add water” alert.
When brewing a new cup on the smallest Keurig coffee makers, which completely empty the water tank each time, refill the tank.
Clean the Mesh Screen in the Reservoir to Remove Gunk
Water that is entering the inner water lines from the water tank is filtered by a tiny mesh filter in your Keurig.
Depending on the Keurig model you have, the mesh screen will be located in a different place. The mesh screen is mounted in the water reservoir of some Keurig models and on the base of the stand that the tank is placed on in other models.
Although it is not necessary to unmount and clean the mesh screen frequently, you are better off doing it occasionally. The mesh screen is frequently forgotten when cleaning Keurig coffee makers.
To clean the mesh screen that is inside the water tank:
- Remove the filter holder from the tank, empty the water tank, and unplug the brewer.
- Use a long magnetic screwdriver to open the 3 screws that hold the lower filter into position on the tank
- Clean the screen in warm, soapy water, or soak the lower filter holder in vinegar for about 45 minutes to get rid of the gunk. You can also use a toothbrush and running water to clean the mesh filter, or you can use a Waterpik flosser to force water through the mesh and open the pores.
- After cleaning, run water through the mesh to ensure that it is unclogged
- Screw the filter holder into place after re-inserting it into the reservoir. Put the upper filter holder back in place.
Use a lint-free towel to clean a filter screen that is mounted on the stand where the tank is located. Clean and rinse the portion of the water tank that rests on the mesh filter while holding the tank upside down.
As an alternative, to remove slime, add water to a food injector without a needle and shoot the water through the water outlet in the reservoir. Prior to flushing with the injector, make sure the water tank is empty.
Clear Air Bubbles in the Water Channels Inside the Keurig
The pipes that draw water from the water tank may experience air bubbles that escape and obstruct the regular flow of water. The brewer may spit the water back into the reservoir as a result of air bubbles.
Hare 3 hacks to remove bubbles from a Keurig that is not dispensing water:
- Before rocking and burping your Keurig to let out any trapped air, unplug it, remove the drip tray and water tank, and detach the water tank.
- As an alternative, you can shake or spank the brewer while it is upside down over a sink to remove debris and air bubbles. Be careful if you notice hot water dripping from the brewer. We recommend unplugging your brewer for at least an hour before turning it upside down to ensure that the water in the heating tank has cooled down
- Another hack to remove air bubbles involves:
- Opening the lid of the water tank and using your finger to close the overflow outlet of the coffee maker
- Check to see if there are any coffee pods inside by lifting the coffee maker’s handle.
- While covering the overflow pipe, lower the handle and brew a water-only cycle. The obstruction-causing air bubbles and loose debris will be forced out of the water lines by the brewer being forced to pump water through the water lines.
Clean the Needles to Unclog a Keurig That is Not Dispensing Water
During the brewing of coffee, the top and bottom needles of a Keurig puncture the K cup. The water’s ability to flow into your cup is hampered by clogged needles.
To clean the upper needle that is located inside the Keurig’s head
- Switch off and unplug the machine,
- To safeguard your pod from harm, raise the handle and remove the pod and the pod holder.
- Find the inlet needle with care. The upper needle has three holes and is tapered.
- Straighten a paper clip, then place one in each hole until it is about one inch deep. To release and clear any debris, wiggle the clip.
To clean the exit needle that is located at the base of your pod holder
- By raising the brewer’s handle, you can remove the pod holder from it. Find the pod holder and push it from below with one hand while holding the top with the other.
- Pull from both of the pod holder’s ends to separate the funnel and reveal the short tube at the bottom of the device after removing the pod holder.
- To get rid of debris, wiggle a paper clip inside the tube.
- For debris cleanup, run running water through the funnel and pod holder.
- Reposition the funnel and reposition the holder in the brewer.
If your Keurig is still not dispensing water or is spitting water back into the reservoir, proceed to step five
Stop Keurig from Spitting Water Back into the Reservoir
Water from the tank is drawn through a channel into the entrance needle of a Keurig brewer. Water returns to the tank through the overflow pipe if this channel is blocked.
Before beginning this unblocking procedure, remove the water jug and unplug the machine.
- Unclog your Keurig by using a compressed air can. Here are the steps to follow
- Place a cup under the brewer as you would do when brewing coffee
- Use a towel to seal the inlet channel and firmly press against the towel with your fingers
- To remove debris, blow compressed air from the air can into the overflow tube. There will be debris and water flowing into your cup
- Run a brew cycle without a pod to see if the Keurig is dispensing water and has no backflow problems by reconnecting the tank and plugging the device.
- Use a straw to unblock your Keurig,
- Ensure adequate time so that water inside the water lines is cool enough for your safety
- Lift the brewer’s handle and remove the pod
- Locate the overhead needle and insert the needle into one end of the straw
- Draw air from the other end of the straw as if you are having a drink
- Water and debris will flow into your mouth
- To verify that the Keurig is pumping out water and has no backflow issues, reattach the tank and plug the device before running a brew cycle without a pod.
- If the problem is resolved, run a vinegar flush to clean your machine before brewing your favorite cup of coffee
Descale a Keurig That is Not Dispensing Water
Follow the steps below to descale a Keurig that is not dispensing water
- Fill the tank with white vinegar and water at a ratio of 1:1
- Ensure that there is no K cup in the machine
- Place an empty cup under the brewer
- Run a brew cycle to flush vinegar through the brewer
- Empty the cup when full and place it into position under the brewer and repeat the brew cycle until the vinegar level in the tank is below the minimum level
- Off the Auto Shut Down setting and leave the machine to sit for about 45 to 60 minutes to soak in the vinegar
- Remove vinegar from the water tank after 45 to 60 minutes and wash the reservoir under running water.
- To rinse the coffee maker, reattach the reservoir to the brewer after filling it with fresh water. Then, brew without using a K cup.
- To get rid of all the vinegar, fill the tank again and run freshwater brew cycles.
Your brewer should be prepared to brew your preferred cup of coffee after successfully completing one or more of our suggested steps to troubleshoot a Keurig that is not dispensing water.
Important Tips
You can completely do without the Keurig water filter if the water system in your house or place of business has a sufficient filter or if you use bottled water to make your coffee.

Average Rating